Microsoft released version 4.5 of its popular .NET Framework in August 2012. This framework can be installed independently on any compatible machine (check out the .NET Framework![]() Deployment Guide for Administrators) and (for developers) come along with Visual Studio 2012.
Deployment Guide for Administrators) and (for developers) come along with Visual Studio 2012.
Windows Azure Web Sites also support .NET 4.5, but what is the easiest way to deploy a .NET 4.5 application to Windows Azure as a Cloud Service? This post shows how easy this is.
Assumption
This post assumes you have updated to the most recent Windows Azure Tools for Visual Studio and the latest SDK for .NET.
For any update to a new operating system or new SDK, consult the Windows Azure Guest OS Releases and SDK Compatibility Matrix to understand which versions of operating systems and Azure SDKs are intended to work together.
You can do this with the Web Platform Installer by installing Windows Azure SDK for .NET (VS 2012) – Latest (best option) – or directly here (2nd option since this link will become out-of-date eventually).
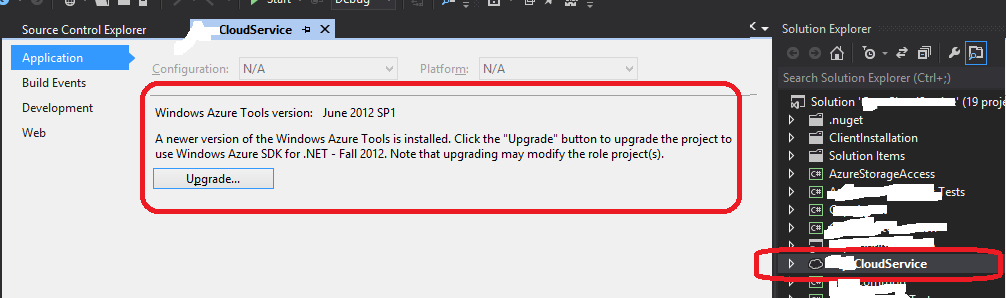
Also pay close attention to the release notes, and don’t forget to Right-Click on your Cloud Service, hit Properties, and take advantage of some of the tooling support for the upgrade:
Creating New ASP.NET Web Role for .NET 4.5
Assuming you have up-to-date bits, a File | New from Visual Studio 2012 will look something like this:

Select a Cloud project template, and (the only current choice) a Windows Azure Cloud Service, and be sure to specify .NET Framework 4.5. Then proceed as normal.
Updating Existing ASP.NET Web Role for .NET 4.5
If you wish to update an existing Web Role (or Worker Role), you need to make a couple of changes in your project.
First, update the Windows Azure Operating System version use Windows Server 2012. This is done by opening your Cloud project (pageofphotos in the screen shot) and opening ServiceConfiguration.Cloud.cscfg.

Change the osFamily setting to be “3” to indicate Windows Server 2012.
osFamily=”3″
As of this writing. the other allowed values for osFamily are “1” and “2” to indicate Windows Server 2008 SP2 and Windows Server 2008 R2 (or R2 SP1) respectively. The up-to-date settings are here.
Now you are set for your operating system to include .NET 4.5, but none of your Visual Studio projects have yet been updated to take advantage of this. For each project that you intend to update to use .NET 4.5, you need to update the project settings accordingly.

First, select the project in the Solution Explorer, right-click on it, and choose Properties from the pop-up menu. That will display the screen shown. Now simply select .NET Framework 4.5 from the available list of Target framework options.
If you open an older solution with the newer Azure tools for Visual Studio, you might see a message something like the following. If that happens, just follow the instructions.

That’s it!
Now when you deploy your Cloud Service to Windows Azure, your code can take advantage of .NET 4.5 features.
Troubleshooting
Be sure you get all the dependencies correct across projects. In one project I migrated, I realized the following came up because I had a mix of projects that needed to stay on .NET 4.0, but those aspects deployed to the Windows Azure Cloud could be on 4.5. If you don’t get this quite right, you may get a compiler warning like the following:
Warning The referenced project ‘CapsConfig’ is targeting a higher framework version (4.5) than this project’s current target framework version (4.0). This may lead to build failures if types from assemblies outside this project’s target framework are used by any project in the dependency chain. SomeOtherProjectThatReferencesThisProject
The warning text is self-explanatory: the solution is to not migrate that particular project to .NET 4.5 from .NET 4.0. In my case, I was trying to take advantage of the new WIF features, and this project did not have anything to do with Identity, so there was no problem.
