Category Archives: How To

Stupid Azure Trick #4 – C#, Node.js, and Python side-by-side – Three Simple Command Line Tools to Copy Files up to Windows Azure Blob Storage

Windows Azure has a cloud file storage service known as Blob Storage.

[Note: Windows Azure Storage is broader than just Blob Storage, but in this post I will ignore its sister services Table Storage (a NoSQL key/value store) and Queues (a reliable queuing service).]

Before we get into the tricks, it is useful to know a bit about Blog Storage.

The code below is very simple – it uploads a couple of files to Blob Storage. The files being uploaded are JSON, so it includes proper setting of the HTTP content-type and sets up caching. Then it lists a directory of the files up in that particular Blob Storage container (where a container is like a folder or subdirectory in a regular file system).

The code listed below will work nicely on a Windows Azure Dev-Test VM, or on your own desktop. Of course you need a Windows Azure Storage Account first, and the storage credentials. (New to Azure? Click here to access a free trial.) But once you do, the coding is straight-forward.

  • For C#: create a Windows Console application and add the NuGet packaged named “Windows Azure Storage”
  • For Node.js: run “npm install azure” (or “npm install azure – –global”)
  • For Python: run “pip install azure” to get the SDK
  • We don’t cover it here, but you could also use PowerShell or the CLI or the REST API directly.

Note: these are command line tools, so there isn’t a web project with config values for the storage keys. So in lieu of that I used a text file on the file system. Storage credentials should be stored safely, regardless of which computer they are used on, so beware my demonstration only using public data so my storage credentials in this case may not be as damaging, if lost, as some others.

Here’s the code. Enjoy!

using System;
using System.Diagnostics;
using System.IO;
using Microsoft.WindowsAzure.Storage;
using Microsoft.WindowsAzure.Storage.Auth;
using Microsoft.WindowsAzure.Storage.Blob;
internal class Program
{
private static void Main(string[] args)
{
var storageAccountName = "azuremap";
// storage key in file in parent directory called <storage_account_name>.storagekey
var storageAccountKey = File.ReadAllText(String.Format("d:/dev/github/{0}.storagekey", storageAccountName));
//Console.WriteLine(storageAccountKey);
var storageContainerName = "maps";
var creds = new StorageCredentials(storageAccountName, storageAccountKey);
var storageAccount = new CloudStorageAccount(creds, useHttps: true);
var blobClient = storageAccount.CreateCloudBlobClient();
var container = blobClient.GetContainerReference(storageContainerName);
string[] files = {"azuremap.geojson", "azuremap.topojson"};
foreach (var file in files)
{
CloudBlockBlob blockBlob = container.GetBlockBlobReference(file);
var filepath = @"D:\dev\github\azuremap\upload\" + file;
blockBlob.UploadFromFile(filepath, FileMode.Open);
}
Console.WriteLine("Directory listing of all blobs in container {0}", storageContainerName);
foreach (IListBlobItem blob in container.ListBlobs())
{
Console.WriteLine(blob.Uri);
}
if (Debugger.IsAttached) Console.ReadKey();
}
}
view raw upload.cs hosted with ❤ by GitHub
var azure = require('azure');
var fs = require('fs');
var storageAccountName = 'azuremap' // storage key in file in parent directory called <storage_account_name>.storagekey
var storageAccountKey = fs.readFileSync('../../%s.storagekey'.replace('%s', storageAccountName), 'utf8');
//console.log(storageAccountKey);
var storageContainerName = 'maps';
var blobService = azure.createBlobService(storageAccountName, storageAccountKey, storageAccountName + '.blob.core.windows.net');
var fileNameList = [ 'azuremap.geojson', 'azuremap.topojson' ];
for (var i=0; i<fileNameList.length; i++) {
var fileName = fileNameList[i];
console.log('=> ' + fileName);
blobService.createBlockBlobFromFile(storageContainerName, fileName, fileName,
{ contentType: 'application/json', cacheControl: 'public, max-age=3600' }, // max-age units is seconds, so 31556926 is 1 year
function(error) {
if (error) {
console.error(error);
}
});
}
blobService.listBlobs(storageContainerName,
function(error, blobs) {
if (error) {
console.error(error);
}
else {
console.log('Directory listing of all blobs in container ' + storageContainerName);
for(var i in blobs) {
console.log(blobs[i].name);
}
}
});
view raw upload.js hosted with ❤ by GitHub
from azure.storage import *
storage_account_name = 'azuremap' # storage key in file in parent directory called <storage_account_name>.storagekey
storage_account_key = open(r'../../%s.storagekey' % storage_account_name, 'r').read()
//print(storage_account_key)
blob_service = BlobService(account_name=storage_account_name, account_key=storage_account_key)
storage_container_name = 'maps'
blob_service.create_container(storage_container_name)
blob_service.set_container_acl(storage_container_name, x_ms_blob_public_access='container')
for file_name in [r'azuremap.geojson', r'azuremap.topojson']:
myblob = open(file_name, 'r').read()
blob_name = file_name
blob_service.put_blob(storage_container_name, blob_name, myblob, x_ms_blob_type='BlockBlob')
blob_service.set_blob_properties(storage_container_name, blob_name, x_ms_blob_content_type='application/json', x_ms_blob_cache_control='public, max-age=3600')
# Show a blob listing which now includes the blobs just uploaded
blobs = blob_service.list_blobs(storage_container_name)
print("Directory listing of all blobs in container '%s'" % storage_container_name)
for blob in blobs:
print(blob.url)
# format for blobs is: <account>.blob.core.windows.net/<container>/<file>
# example blob for us: pytool.blob.core.windows.net/pyfiles/clouds.jpeg
view raw upload.py hosted with ❤ by GitHub

Useful Links

Python

http://research.microsoft.com/en-us/projects/azure/an-intro-to-using-python-with-windows-azure.pdf

http://research.microsoft.com/en-us/projects/azure/windows-azure-for-linux-and-mac-users.pdf

http://www.windowsazure.com/en-us/develop/python/

SDK Source for Python: https://github.com/WindowsAzure/azure-sdk-for-python

Node.js

http://www.windowsazure.com/en-us/develop/nodejs/

SDK Source for Node.js: https://github.com/WindowsAzure/azure-sdk-for-node

http://www.windowsazure.com/en-us/documentation/articles/storage-nodejs-how-to-use-blob-storage/

C#/.NET

http://www.windowsazure.com/en-us/develop/net/

Storage SDK Source for .NET: https://github.com/WindowsAzure/azure-storage-net

Storage Client Library 3: http://msdn.microsoft.com/en-us/library/dn495001%28v=azure.10%29.aspx

[This is part of a series of posts on #StupidAzureTricks, explained here.]

Stupid Azure Trick #3 – Create a Dev Virtual Machine in Windows Azure

“Everyone” knows about using cloud services for running web applications and databases. For example, Windows Azure offers a bevy of integrated compute, storage, messaging, monitoring, networking, identity, and ALM services across its world-wide data centers.

But what about the idea of leveraging the cloud for software development and testing? Of course there is great productivity in using hosted services for a lot of the ancillary tasks in software development – source control, issue tracking, and so on. Example cloud solutions for source control would include two that I use regularly, GitHub and Team Foundation Service (TFS). But what about for hands-on software development – creating, running, testing, and iterating on code?

There are really two significant ways you can go here. One way – that I will not be drilling into – is to use a cloud-hosted web browser-based development environment. This is what’s going on with Monaco, which is a cloud-hosted version of Visual Studio that runs entirely in a web browser – but (very awesomely) integrates with Windows Azure. There are also third-parties playing in this space, such as Cloud 9.

The other way – the one I am going to drill into – is using a Windows Azure Virtual Machine for certain development duties.

[Making a case for when and why one might create a dev-test environment in the cloud will be left for another time…]

With great power comes great responsibility

Spiderman knows this, and you need to know it as well.

Virtual Machines in the cloud cost money while they are deployed. It is your great responsibility to turn them off when you don’t need them.

The pricing for “normal” virtual machines (as opposed to MSDN Pricing which is described below) is listed at http://www.windowsazure.com/en-us/pricing/details/virtual-machines/. For example, at the time of this writing, the price for a Windows Server VM ranges from $0.02 (two cents) to $1.60 per hour, while the price for a Windows Server VM with SQL Server ranges from $2.92 to $7.40 per hour. The $7.40/hour VM is an instance running on a VM with 8 cores and 56 GB of RAM.

NOTE: just before publication time, Windows Azure announced some even larger “compute-intensive” VMs, A8 and A9 sizes. The A9 costs $4.90 per hour and sports 16 cores, 112 GB of memory, and runs on a “40 Gbit/s InfiniBand network that includes remote direct memory access (RDMA) technology for maximum efficiency of parallel Message Passing Interface (MPI) applications. […] Compute-intensive instances are optimal for running compute and network-intensive applications such as high-performance cluster applications, applications using modeling, simulation and analysis, and video encoding.” Nice! These are available for VMs in Cloud Services, and I would expect them to become available for all VMs in due course.

Some VMs cost more per hour (I’m looking at you BizTalk Server) and some costs are as yet unknown (such as for Oracle databases, which are in preview and production pricing has yet to be revealed).

VM prices vary for two reasons: (a) resources allocated (e.g., # of cores, how much RAM) and (b) licensing. For the same sized VM, one running SQL Server will cost more than one running Windows Server only. This is a feature – for example, you can rent a SQL Server license for 45 minutes if you like.

Of course, while inexpensive, and nearly inconsequential in small quantities, these prices can add up if you use a lot of VM hours. The good news is, you can release VM resources when you are not using them. You don’t incur VM costs when the VM is not occupying a VM, though there is a small storage cost that starts at $0.07 (seven cents) per GB per month.

Just don’t forget to free your resources before leaving for vacation.

Fortunately, VMs can easily be stopped in the portal, by using the Remove-AzureVM PowerShell cmdlet, by using the azure vm shutdown command from the cross-platform CLI, through management REST APIs, or using one of the language SDKs.

Example prices were expressed in terms of “per hour” but the pricing granularity is actually by the minute. In some clouds, usage granularity is hourly, or possibly “any part of the hour” meaning a VM deployed from, say, 7:50 to 8:10 would incur 120 minutes of billing (two hours), even though actual time was 20 minutes. In Azure, you would be billed 20 minutes. The billing granularity matters more when using VMs for focused tasks like developers and testers would tend to do.

Further, there’s a data transfer price for data leaving the data center.

You may be interested in Windows Azure Billing Alerts.

MSDN Pricing – A Big Cloudy Discount

If you have an MSDN account (not just for big companies, but also with startups) – as long as you claim your Azure benefits – magically, you are eligible for special MSDN Pricing. Check for the current MSDN discounted pricing, but as of this writing MSDN includes either $50, $100, or $150 of Azure credits per month, depending on your level of MSDN. Anyone on your team with an MSDN account will have their own Azure credits.

This means that your monthly bill will draw from this balance before you incur actual costs. You can also choose to configure the account to not allow overages, such that when your monthly allotment is exhausted, consumption stops. This way you know your credit card will not be charged. You can selectively re-enable it for the rest of the month. This is not a bad default setting to avoid runaway dev-test costs due to forgetting to turn off resources when you didn’t need them.

Beyond this, you get a huge discount on other VMs – no matter what the VM is, you never pay more than $0.06 per hour per small VM unit.

MSDN pricing only applies to resources used for Dev-Test – it is not licensed for production use, nor does it come with an SLA.

But that’s such a good deal, that anyone using Windows Azure for Dev-Test should take a hard look at this option if they don’t already have an MSDN account. But this post is all about creating a Dev-Test VM, so let’s get on with it.

Creating a Dev-Test Virtual Machine in Windows Azure

Let’s set up for C#, Python, and Node.js development.

First, log into your Windows Azure account at https://manage.windowsazure.com.

image

image

image

image

If the MSDN checkbox is disabled, you have logged into a Windows Azure account that is not associated with your MSDN account. Change to the correct account to proceed.

Select the MSDN checkbox to filter out any VM image not specific to MSDN subscribers, and see the list of available VM images change to the following:

image

Note the text on the descriptive text on the right-hand side, which I’ve included here since it provides some useful information.

The Visual Studio Professional 2013 developer desktop is an offering exclusive to MSDN subscribers. The image includes Visual Studio Professional 2013, SharePoint 2013 Trial, SQL Server 2012 Developer edition, Windows Azure SDK for .NET 2.2 and configuration scripts to quickly create a development environment for Web, SQL and SharePoint 2013 development.

To learn how to configure any development environment you can follow the links on the desktop.

We recommend a Large VM size for SQL and Web development and ExtraLarge VM size for SharePoint development.

Please see http://go.microsoft.com/fwlink/?LinkID=329862 for a detailed description of the image. Privacy note: This image has been preconfigured for Windows Azure, including enabling the Visual Studio Experience Improvement Program for Visual Studio, which can be disabled.”

Choose one of the Visual Studio images (I will choose Visual Studio Professional 2013) and go to the next page by clicking the arrow at the bottom-right.

image

Fill in the fields. The username and password will be needed later to RDP into the box. Click the arrow to go to the next page.

image

I kept most of the defaults, only changing the REGION to be “East US” to minimize latency to my current location. Click arrow to go to next page.

If I planned to use this for giving a talk in another geographic location, I may choose a different region. For example, I may choose “North Europe” (Dublin) if I was speaking in Ireland (which would be wonderful and I hope happens some day :-)).

image

No changes on this page, so click check-mark to finish.

image

The portal will “think” for a short time, then your new virtual machine – listed under the name you gave it (“vspro-demo” for me), with the corresponding cloud service that was created (“vspro-demo.cloudapp.net” for me) which also serves as its DNS name (that you’ll use to access it via RDP).

image

Once it finishes, you can select it and hit CONNECT. This will download a file that will launch the RDP client which will allow you to login.

image

I usually check off “Don’t ask me again…” because I know this connection is fine.

image

Note that here you will want to click “Use another account” so you can specify your VM-specific credentials.

image

Click OK then…

image

I usually check off “Don’t ask me again…” because I know this connection is fine.

Now I’m in!

image

Configuring your Dev-Test Machine on Windows Azure

When configuring a new machine, there are many tools you may want to install. For this exercise, I will keep it simple. (The following use my handy “which” function in PowerShell to find locations of commands in the path. If you add “which” to your environment, be sure to close your PowerShell shell and open a new one so that the new $PROFILE is processed. If you
choose to not install “which” then issue the same commands and you should just get errors instead.)

With a PowerShell shell, let’s investigate what we have on a new machine.

image

We can see that, in turn, that:

  • While PowerShell is installed (we are running in a PowerShell shell), there are no PowerShell cmdlets with “Azure” in the name.
  • Node.js is not found (no Node Package Manager (npm) and no Node runtime (node).
  • The cross-platform (xplat) Command Line Interface (CLI) is not installed. This has Node.js as a dependency.
  • No Python interpreter is installed.
  • The Web Platform Installer actually is installed, so let’s use that to add the other pieces to our development environment.

image

After filtering, in succession, (in search box at the top-right)…

.. on PowerShell:

image

Click the “Add” button to add the latest “Windows Azure PowerShell” release.

.. on Cross-platform:

image

Click the “Add” button to add the latest “Windows Azure Cross-platform Command Line Tools” release.

and .. on Python:

image

Click the “Add” button to add the latest “Windows Azure SDK for Python” release.

image

Click the “Add” button to add the latest “Python Tools 2.0 for Visual Studio 2013” release. This includes some really cool python tooling for Visual Studio, though we won’t discuss it further in this post.

Now click the “Install” button to start the installation.

image

You can accept all the licensing with one click.

The installation will download and install the items you selected, including any dependencies.

image

image

image

(compiling Python distribution as part of the installation…)

image

image

image

Installation is complete.

Verifying the Installation

Open a new PowerShell Window to explore once again.

image

Note that we ran the “get-help azure” command through a filter (the Measure-Object cmdlet, which was used to count lines) since output would otherwise not have fit on one screen (there are a couple of hundred Azure cmdlets in the list). Of npm, node, azure, and python, only azure (via azure.cmd, the entry point to the CLI) shows up in our path. This is okay, since we can now run azure at the command line and it knows where to find Node.js.

image

As for python, that is now installed at c:\python27\python.exe. We can either add c:\python to our path, or invoke it explicitly using the full path. For our simple example, we’ll just invoke it explicitly. To see that the Windows Azure SDK for Python is installed, we can use pip, a Python package manager, to list the installed packages.

image

We can see that “azure (0.7.1)” is installed.

Done. Now go write some Python, Node, or C# code!

Useful Links

[This is part of a series of posts on #StupidAzureTricks, explained here.]

Can I use Multiple Monitors with Remote Desktop (RDP)? Yes. Here’s how.

Like lots of developers I know, I am more productive with multiple monitors. I have two displays, though I’m sure many of you have more screens than that.

Picture of Bill's two-monitor setup

I also spend a lot of time connecting into the cloud from my desktop. A common scenario is to use Remote Desktop to connect to a VM running in Windows Azure. I have always been disappointed that my remote desktop session did not take advantage of my multi-monitor setup. To be honest, until recently I assumed it was not even possible. I recently explored the Remote Desktop options and realized I was very wrong. It is very simple!

Why RDP Options are Easy to Overlook

First, let’s suppose you are launching RDP from the Windows Azure portal. You bring up the Virtual Machines screen, click on the VM of interest, and you’ll be looking at a screen like the following.

image

After clicking Connect along the bottom, you see this (or similar – different browsers handle downloads a little differently – this is Firefox):

image

Now you may click Save and the .rdp file is now local, leading to this:

image

You can simply now click Open to open up your session. Up pops a dialog asking for your credentials:

image

After you supply your credentials, you are logged into the VM. Done.

The problem with this is that it is too convenient – it bypasses the main Remote Deskop UI – and that’s where all the fancy options are for enabling support for multiple monitors.

Determining RDP Public Port for Windows Azure VM

For this step you need to know which public port you need to use to access your VM.

This port number is available in a couple of places. One place is in the Remote Desktop client itself. If you bring up a new instance of the Remote Desktop client, it will usually show you the last connection you made. The screen below shows port number 56008 after the DNS name.

image

Another place to check for from the Windows Azure Portal. The Remote Desktop port is configured on the ENDPOINTS tab, so viewing that will give you the information you need:

image

The public port is what you need (56008) in this case. This port number will vary from VM to VM, though will always redirect to private port 3389 (which is the default port at which Remote Desktop servers listen for Remote Desktop Protocol (RDP) connections).

Configuring Multi-Monitor Support in Remote Desktop Client

With the DNS name and port number in hand, you can construct the correct “Computer” value, such as:

image_thumb[5]

Click “Show Options” and then move to the “Display” tab.

image_thumb[6]

Select the “Use all my monitors for the remote session” option.

Done. Yes, it was that easy.

We’ll close out with a screen shot showing PowerShell and Explorer on one monitor and Visual Studio on the other, all running from a Windows Azure Virtual Machine.

image

Are you missing an assembly reference? Why, yes I am. So kind of you to ask.

Ever pull down the source code for a project, only to find many errors of the “The type or namespace name ‘Optimization’ does not exist in the namespace ‘System.Web’ (are you missing an assembly reference?)” variety?

This just happened to me because I pulled down the Page of Photos source code from github for the first time to a certain dev machine. Not all of the binary library dependencies are checked into github (trying to just check in source code), so how does this happen and how should it be fixed?

image

In my experience, this usually relates to NuGet packages. There are at least two reasonable solutions.

Solution #1: Capture All Binaries (not recommended)

Check into source control the binaries for those packages your project depend on so they’ll always be there. Personally, that seems so last year, and I don’t take this approach for libraries available through NuGet.

(Having private libraries is no longer a reason to do this either. Check out MyGet,org for a hosted private solution that works fine with NuGet machinery.)

Solution #2: Empower NuGet to Self-Heal

Right-click on the Solution from the Visual Studio Solution Explorer and notice the two NuGet-related options in the pop-up menu. To fix the problem imageat hand in the most convenient manner, simply select “Enable NuGet Package Restore” which is the second of the NuGet-related options.

You will then get an explanation of what’s about to happen:

image

If you choose “Yes” then NuGet will think for a few seconds before declaring victory:

image

You might notice there are some new NuGet-related artifacts in your solution.

image

Now if you again right-click on the Solution from Visual Studio’s Solution Explorer menu, you will notice that the “Enable NuGet Package Restore” menu is gone, leaving only the “Manage NuGet Packages for Solution” option. Select the “Enable NuGet Package Restore” menu to bring up the NuGet management dialog.

image

Click on “Restore” and your solution should begin to heal itself by downloading the many missing NuGet packages. You can feel the excitement as NuGet thinks it through..

image

.. and thinks some more ..

image

.. then – Ta Da! – you suddenly have a bunch of downloaded libraries.

image

Now your solution will happily compile once more.

Note that this is a one-time & long-term solution since now NuGet is empowered to pull down missing packages whenever needed. (Not “any old packages” of course – just those you’ve added to the projects within the solution.) When you freshly pull down a build (just the source) from source control it helps, of course, but build machines will also enjoy this.

Start Windows Azure Storage Emulator from a Shortcut

When building applications to run on Windows Azure you can get a lot of development and testing done without ever leaving your developer desktop. Much of this is due to the convenient fact that much code “just works” on Windows Azure. How can that be, you might wonder? Running on Windows Azure in many cases amounts to nothing different than running on Windows Server 2012 (or Linux, should you chose). In other words, most generic PHP, C#, C++, Java, Python, and <your favorite language here> code just works.

Once your code starts accessing specific cloud features, you face a choice: access those services in the cloud, or use the local development emulator. You can access most cloud services directly from code running on your developer desktop – it usually just amounts to a REST call under the hood (with some added latency from desktop to cloud and back) – it is an efficient and effective way to debug. But the development emulator gives you another option for certain Windows Azure cloud services.

A common use case for the local development emulator is to have web applications such as with ASP.NET, ASP.NET MVC, and Web API that run either in Cloud Services or just in a Web Site. This is an important difference because when debugging, Visual Studio will start the Storage Emulator automatically, but this will not happen if you debugging web code that does not run from a Cloud Service. So if your web code is accessing Blob Storage, for example, when you run it locally you will get a timeout when it attempts to access Storage. That is, unless you ensure that the Storage Emulator has been started. Here’s an easy way to do this. (Normally, you only need to do this once per login (since it keeps running until you stop it).)

In my case, it was very convenient to have a shortcut that I could click to start the Storage Emulator on occasion. Here’s how to set it up. I’ll explain it as a shortcut (such as on a Windows 8 desktop), but the key step is very simple and easily used elsewhere.

Creating the Desktop Shortcut

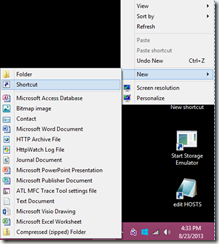
  1. Right-click on a desktop
  2. From pop-up menu, choose New –> Shortcut      image
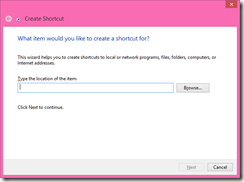
  3. You get a dialog box asking about what you’d like to create a shortcut for:image
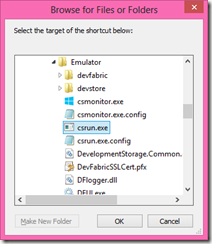
  4. HERE’S IMPORTANT PART 1/2: click hit the Browse button and navigate to wherever your Windows Azure SDK is installed and drill into the image
  5. In my case this places the path "C:\Program Files\Microsoft SDKs\Windows Azure\Emulator\csrun.exe" into the text field.
  6. HERE’S IMPORTANT PART 2/2: Now after the end of the path (after the second double quote) add the parameter /devstore:start which indicates to start up the Storage Emulator.
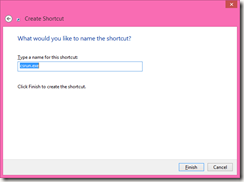
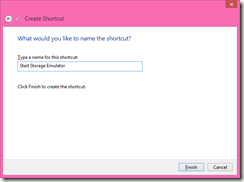
  7. Click Next to reach the last step – naming the shortcut: image
  8. Perhaps change the name of the shortcut from the default (csrun.exe) to something like Start Storage Emulator: image
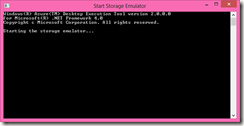
  9. Done! Now you can double-click this shortcut to fire up the Windows Azure Storage Emulator: image 

On my dev computer, the path to start the Windows Azure Storage Emulator was: "C:\Program Files\Microsoft SDKs\Windows Azure\Emulator\csrun.exe" /devstore:start

Now starting the Storage Emulator without having to use a Cloud Service from Visual Studio is only a double-click away.

RELATED

Azure FAQ: How to Use .NET 4.5 with Windows Azure Cloud Services?

Microsoft released version 4.5 of its popular .NET Framework in August 2012. This framework can be installed independently on any compatible machine (check out the .NET FrameworkThe Azure FAQ Deployment Guide for Administrators) and (for developers) come along with Visual Studio 2012.

Windows Azure Web Sites also support .NET 4.5, but what is the easiest way to deploy a .NET 4.5 application to Windows Azure as a Cloud Service? This post shows how easy this is.

Assumption

This post assumes you have updated to the most recent Windows Azure Tools for Visual Studio and the latest SDK for .NET.

For any update to a new operating system or new SDK, consult the Windows Azure Guest OS Releases and SDK Compatibility Matrix to understand which versions of operating systems and Azure SDKs are intended to work together.

You can do this with the Web Platform Installer by installing Windows Azure SDK for .NET (VS 2012) – Latest (best option) – or directly here (2nd option since this link will become out-of-date eventually).

Also pay close attention to the release notes, and don’t forget to Right-Click on your Cloud Service, hit Properties, and take advantage of some of the tooling support for the upgrade:

UpgradeFall2012

Creating New ASP.NET Web Role for .NET 4.5

Assuming you have up-to-date bits, a File | New from Visual Studio 2012 will look something like this:

image

Select a Cloud project template, and (the only current choice) a Windows Azure Cloud Service, and be sure to specify .NET Framework 4.5. Then proceed as normal.

Updating Existing ASP.NET Web Role for .NET 4.5

If you wish to update an existing Web Role (or Worker Role), you need to make a couple of changes in your project.

First, update the Windows Azure Operating System version use Windows Server 2012. This is done by opening your Cloud project (pageofphotos in the screen shot) and opening ServiceConfiguration.Cloud.cscfg.

image

Change the osFamily setting to be “3” to indicate Windows Server 2012.

   osFamily=”3″

As of this writing. the other allowed values for osFamily are “1” and “2” to indicate Windows Server 2008 SP2 and Windows Server 2008 R2 (or R2 SP1) respectively. The up-to-date settings are here.

Now you are set for your operating system to include .NET 4.5, but none of your Visual Studio projects have yet been updated to take advantage of this. For each project that you intend to update to use .NET 4.5, you need to update the project settings accordingly.

image

First, select the project in the Solution Explorer, right-click on it, and choose Properties from the pop-up menu. That will display the screen shown. Now simply select .NET Framework 4.5 from the available list of Target framework options.

If you open an older solution with the newer Azure tools for Visual Studio, you might see a message something like the following. If that happens, just follow the instructions.

WindowAzureTools-dialog-NeedOct2012ToolsForDotNet45

That’s it!

Now when you deploy your Cloud Service to Windows Azure, your code can take advantage of .NET 4.5 features.

Troubleshooting

Be sure you get all the dependencies correct across projects. In one project I migrated, I realized the following came up because I had a mix of projects that needed to stay on .NET 4.0, but those aspects deployed to the Windows Azure Cloud could be on 4.5. If you don’t get this quite right, you may get a compiler warning like the following:

Warning  The referenced project ‘CapsConfig’ is targeting a higher framework version (4.5) than this project’s current target framework version (4.0). This may lead to build failures if types from assemblies outside this project’s target framework are used by any project in the dependency chain.    SomeOtherProjectThatReferencesThisProject

The warning text is self-explanatory: the solution is to not migrate that particular project to .NET 4.5 from .NET 4.0. In my case, I was trying to take advantage of the new WIF features, and this project did not have anything to do with Identity, so there was no problem.

How to Enable ASP.NET Trace Statements to Show Up In Windows Azure Compute Emulator

As you may be aware, Windows Azure has a cloud simulation environment that can be run on a desktop or laptop computer to make it easier to develop applications for the Windows Azure cloud. One of the tools is the Compute Emulator which simulates the running of Web Roles and Worker Roles as part of Cloud Services. The Compute Emulator is handy for seeing what’s going on with your Cloud Services, including display of logging trace messages from your application or from Azure. A small anomaly in the developer experience is the use of System.Diagnostics.Trace is configured to output to the Compute Emulator – but only when invoked from Web Role or Worker Role processes; trace statements from ASP.NET code (at least when using full IIS) do not appear. This is because ASP.NET processes lack the DevelopmentFabricTraceListener in the Trace.TraceListeners collection (as described long ago by fellow Windows Azure MVP Andy Cross (@andybareweb)).

The assembly needed in Andy’s instructions is hard to find these days (it lives in the GAC) and is undocumented. And you only want to do this in debug code running in your local Cloud Simulation environment anyway. So explicitly referencing the needed assembly feels a little dirty since you’d never want it to be deployed accidentally to the cloud.

The Solution

I’ve taken these considerations and created a very simple to use method that you can easily call from ASP.NET code — probably from Application_Start in Global.asax.cs — and not worry about it polluting your production code or causing other ills. The code uses reflection to load the needed assembly to avoid the need for an explicit reference, and the dynamic loading is only done under the proper circumstances; loading the assembly would never be attempted in a cloud deployment.

The Code


// Code snippet for use in Windows Azure Cloud Services.
// The EnableDiagnosticTraceLoggingForComputeEmulator method can be called from ASP.NET
// code to enable output from the System.Diagnostics.Trace class to appear in the
// Windows Azure Compute Emulator. The method does nothing when deployed to the cloud,
// when run outside the compute emulator, when run other than in DEBUG, or run repeatedly.
//
// The code uses Reflection to dynamically load the needed assembly and create the
// specific TraceListener class needed.
//
// EXAMPLE INITIALIZING FROM Global.asax.
// protected void Application_Start()
// {
// // .. other config
// EnableDiagnosticTraceLoggingForComputeEmulator();
// }
//
// EXAMPLE BENEFIT – ASP.NET MVC Controller
// public ActionResult Index()
// {
// Trace.TraceInformation("This message ONLY show up in the Windows Azure Compute Emulator" +
// " if EnableDiagnosticTraceLoggingForComputeEmulator() has been called!");
// return View();
// }
//
// Bill Wilder | @codingoutloud | Nov 2012
// Original: https://gist.github.com/4099954
using System.Reflection;
using System.Diagnostics;
[Conditional("DEBUG")] // doc on the Conditional attribute: http://msdn.microsoft.com/en-us/library/system.diagnostics.conditionalattribute.aspx
void EnableDiagnosticTraceLoggingForComputeEmulator()
{
try
{
if (RoleEnvironment.IsAvailable && RoleEnvironment.IsEmulated)
{
const string className =
"Microsoft.ServiceHosting.Tools.DevelopmentFabric.Runtime.DevelopmentFabricTraceListener";
if (Trace.Listeners.Cast<TraceListener>().Any(tl => tl.GetType().FullName == className))
{
Trace.TraceWarning("Skipping attempt to add second instance of {0}.", className);
return;
}
const string assemblyName =
"Microsoft.ServiceHosting.Tools.DevelopmentFabric.Runtime, Version=1.0.0.0, Culture=neutral, PublicKeyToken=31bf3856ad364e35";
//var path = Assembly.ReflectionOnlyLoad(assemblyName).Location;
//Assembly assembly = Assembly.LoadFile(path);
var assembly = Assembly.LoadFile(assemblyName);
var computeEmulatorTraceListenerType = assembly.GetType(className);
var computeEmulatorTraceListener = (TraceListener)Activator.CreateInstance(computeEmulatorTraceListenerType);
System.Diagnostics.Trace.Listeners.Add(computeEmulatorTraceListener);
Trace.TraceInformation("Diagnostic Trace statements will now appear in Compute Emulator: {0} added.", className);
}
}
catch (Exception)
{
// eat any exceptions since this method offers a No-throw Guarantee
// http://en.wikipedia.org/wiki/Exception_guarantees
}
}


Bill is the author of the book Cloud Architecture Patterns, recently published by O’Reilly. Find Bill on twitter @codingoutloud or contact him for Windows Azure consulting.

Cloud Architecture Patterns book

Four 4 tips for developing Windows Services more efficiently

Are you building Windows Services?

I recently did some work with Windows Services, and since it had been rather a long while since I’d done so, I had to recall a couple of tips and tricks from the depths of my memory in order to get my “edit, run, test” cycle to be efficient. The singular challenge for me was quickly getting into a debuggable state with the service. How I did this is described below.

Does Windows Azure support Windows Services?

First, a trivia question…

Trivia Question: Does Windows Azure allow you to deploy your Windows Services as part of your application or cloud-hosted service?

Short Answer: Windows Azure is more than happy to run your Windows Services! While a more native approach is to use a Worker Role, a Windows Service can surely be deployed as well, and there are some very good use cases to recommend them.

More Detailed Answer: One good use case for deploying a Windows Service: you have legacy services and want to use the same binary on-prem and on-azure. Maybe you are doing something fancy with Azure VM Roles. These are valid examples. In general – for something only targetting Azure – a Worker Role will be easier to build and debug. If you are trying to share code across a legacy Windows Service and a shiny new Windows Azure Worker Role, consider following the following good software engineering practice (something you may want to do anyway): factor out the “business logic” into its own class(es) and invoke it with just a few lines of code from either host (or a console app, a Web Service, a unit test (ahem), etc.).

Windows Services != Web Services

Most readers will already understand and realize this, but just to be clear, a Windows Service is not the same as a Web Service. This post is not about Web Services. However, Windows Azure is a full-service platform, so of course has great support for not only Windows Services but also Web Services. Windows Communication Foundation (WCF) is a popular choice for implementing Web Services on Windows Azure, though other libraries work fine too – including in non-.NET languages and platforms like Java.

Now, on to the main topic at hand…

Why is Developing with Windows Services Slower?

Developing with Windows Services is slower than some other types of applications for a couple of reasons:

  • It is harder to stop in the Debugger from Visual Studio. This is because a Windows Service does not want to be started by Visual Studio, but rather by the Service Control Manager (the “scm” for short – pronounced “the scum”). This is an external program.
  • Before being started, Windows Services need to be installed.
  • Before being installed, Windows Services need to be uninstalled (if already installed).

Tip 1: Add Services applet as a shortcut

I find myself using the Services applet frequently to see which Windows Services are running, and to start/stop and other functions. So create a shortcut to it. The name of the Microsoft Management Console snapin is services.msc and you can expect to find it in Windows/System32, such as here: C:\Windows\System32\services.msc

A good use of the Services applet is to find out the Service name of a Windows Service. This is not the same as the Windows Services’s Display name you seen shown in the Name column. For example, see the Windows Time service properties – note that W32Time is the real name of the service:

Tip 2: Use Pre-Build Event in Visual Studio

Visual Studio projects have the ability to run commands for you before and after the regular compilation steps. These are known as Build Events and there are two types: Pre-build events and Post-build events. These Build Events can be accessed from your Project’s properties page, on the Build Events side-tab. Let’s start with the Pre-build event.

Use this event to make sure there are no traces of the Windows Service installed on your computer. Depending on where you install your services from (see Tip 3), you may find that you can’t even recompile your service until you’ve at least stopped it; this smooths out that situation, and goes beyond it to make the usual steps happen faster than you can type.

One way to do this is to write a command file –  undeploy-service.cmd – and invoke it as a Pre-build event as follows:

undeploy-service.cmd

You will need to make sure undeploy-service.cmd is in your path, of course, or else you could invoke it with the path, as in c:\tools\undeploy-service.cmd.

The contents of undeploy-service.cmd can be hard-coded to undeploy the service(s) you are building every time, or you can pass parameters to modularize it. Here, I hard-code for simplicity (and since this is the more common case).

set ServiceName=NameOfMyService
net stop %ServiceName%
C:\WINDOWS\Microsoft.NET\Framework\v4.0.30319\installutil.exe /u %ServiceName%
sc delete %ServiceName%
exit /b 0
Here is what the commands each do:
  1. Set a reusable variable to the name of my service (set ServiceName=NameOfMyService)
  2. Stop it, if it is running (net stop)
  3. Uninstall it (installutil.exe /u)
  4. If the service is still around at this point, ask the SCM to nuke it (sc delete)
  5. Return from this .cmd file with a  success status so that Visual Studio won’t think the Pre-Build event ended with an error (exit /b 0 => that’s a zero on the end)
In practice, you should not need all the horsepower in steps 2, 3, and 4 since each of them does what the prior one does, plus more. They are increasingly powerful. I include them all for completeness and your consideration as to which you’d like to use – depending on how “orderly” you’d like to be.

Tip 3: Use Post-Build Event in Visual Studio

Use this event to install the service and start it up right away. We’ll need another command file – deploy-service.cmd – to invoke as a Post-build event as follows:

deploy-service.cmd $(TargetPath)

What is $(TargetPath) you might wonder. This is a Visual Studio build macro which will be expanded to the full path to the executable – e.g., c:\foo\bin\debug\MyService.exe will be passed into deploy-service.cmd as the first parameter.  This is helpful so that deploy-service.cmd doesn’t need to know where your executable lives. (Visual Studio build macros may also come in handy in your undeploy script from Tip 2.)

Within deploy-service.cmd you can either copy the service executables to another location, or install the service inline. If you copy the service elsewhere, be sure to copy needed dependencies, including debugging support (*.pdb). Here is what deploy-service.cmd might contain:

set ServiceName=NameOfMyService
set ServiceExe=%1
C:\WINDOWS\Microsoft.NET\Framework\v4.0.30319\InstallUtil.exe %ServiceExe%
net start %ServiceName%
Here is what the commands each do:
  1. Set a reusable variable to the name of my service (set ServiceName=NameOfMyService)
  2. Set a reusable variable to the path to the executable (passed in via the expanded $(TargetPath) macro)
  3. Install it (installutil.exe)
  4. Start it (net start)
Note that net start will not be necessary if your Windows Service is designed to start automatically upon installation. That is specified through a simple property if you build with the standard .NET template.

Tip 4: Use System.Diagnostics.Debugger in your code

If you follow Tip 2 when you build, you will have no trouble building. If you follow Tip 3, your code will immediately begin executing, ready for debugging. But how to get it into the debugger? You can manually attach it to a running debug session, such as through Visual Studio’s Debug menu with the Attach to Process… option.

I find it is often more productive to drop a directive right into my code, as in the following:

void Foo()
{
int x = 1;
System.Diagnostics.Debugger.Launch(); // use this…
System.Diagnostics.Debugger.Break();    // … or this — but not both
}

System.Diagnostics.Debugger.Launch will launch into a into debugger session once it hits that line of code and System.Diagnostics.Debugger.Break will break on that line. They are both useful, but you only need one of them – you don’t need them both – I only show both here for illustrative purposes. (I have seen problems with .NET 4.0 when using Break, but not sure if .NET 4.0 or Break is the real culpret. Have not experienced any issues with Launch.)

This is the fastest way I know of to get into a debugging mood when developing Windows Services. Hope it helps!

Cure for “NO INSTALLATION MEDIA” Error when Zune Installer Can’t Find the Media for Installation Package

How I got around Zune’s “NO INSTALLATION MEDIA” and “Can’t Find the Media for Installation Package” error

 I recently reinstalled Windows 7 on one of my computers and in rebuilding my development tool set, including for Windows Phone, and found I could not run a Windows Phone 7 project locally: Visual Studio complained I did not have the Zune software installed. Okay, not a problem; I will install Zune. But not so fast…

I encountered the following mysterious error while trying to install the Zune software to my Windows 7 desktop.

What does this Zune error message mean?

 
Looking at the text of the message did not help me or yield obvious clues:

NO INSTALLATION MEDIA

Can’t find the media for installation package ‘Windows Media Format SDK’. It might be incomplete or corrupt.

Error code: 0x80070002

Searching around the internets did not help, though I saw a reference to do a few things, one of which was to install the latest Windows Media Player. Well… it turns out, I had NO version of the Windows Media Player installed, so I simply installed the latest, and the Zune installer was happy…

One more step

But Visual Studio 2010 was NOT yet willing to allow me to run the Windows Phone 7 emulator to test and debug my Windows Phone applications. I saw the following additional (but improved!) errors from Visual Studio.

First, could not deploy. Nothing new here:

But the reason provided looked more promising:

This is a better known error, easily rectified. Simply switch to the emulator if your project is referencing an attached device, done at the top of Visual Studio as shown here:

Okay… now back to Windows Phone 7 development – of course, with a Windows Azure back-end using the Windows Azure Toolkit for Windows Phone 7.

4 Reasons to embrace the “www” subdomain prefix in your Web Addresses, and how to do it right

In support of the www subdomain prefix

For web addresses, I used to consider the “www” prefix an anachronism and argued that its use be deprecated in favor of the plain-old domain. In other words, I used to consider forms such as bostonazure.org superior to the more verbose www.bostonazure.org.

I have seen the light and now advocate the use of the “www” prefix – which is technically a  subdomain – for clarity and flexibility. I now consider www.bostonazure.org superior to the overly terse bostonazure.org.

I am not alone in my support of the www subdomain. Not only is there a “yes www” group – found at www.yes-www.org – advocating we keep using the www prefix, there is also an “extra www” group – found at www.www.extra-www.org [sic] – advocating we go all in and start using two sets of www prefixes. While I’m not ready to side with the extra www folks (which would give us www.www.bostonazure.org), for those who do, you might want to know they offer the following nifty badge for your displaying pleasure.

image

While use of two “www” prefixes may one too many, here are 4 reasons to embrace a single “www’ prefix, followed by 2 tips on how to implement it correctly.

Four reasons to embrace the www prefix

traffic light

Reason #1: It’s a user-friendly signal, even if occasionally redundant

The main, and possibly best, reason is that it is user-friendly. Users have simply come to expect a www prefix on web pages.

The “www” prefix provides a good signal. You might argue that it is redundant: Perhaps the http:// protocol is sufficient? Or the “.com” at the end?

First, consider that the http:// protocol is not always specified; it is common to see sites advertised in the form www.example.com.

Second, consider that the TLD (top-level-domain) can vary – not every web site it a “dot com” – it might be a .org, .mil, or a TLD from another country – many of which may not be obvious as web addresses for the common user without a www prefix, even with the http:// protocol.

Third, consider that even if there are cases where the www is redundant, that is still okay. An additional, familiar signal to humans letting them know with greater confidence that, yes, this is a web address, is a benefit, not a detriment.

Today, most users probably think that the Web and the Internet are synonymous anyway. To most users, there is nothing but the www – we need to realize that today’s Internet is inhabited by regular civilians (not just programmers and hackers).  Let’s acknowledge this larger population by utilizing the www prefix and reducing net confusion (pun intended).

Reason #2: Go with the flow

The application and browser vendors are promoting the www prefix.

Microsoft Word and Microsoft Outlook – two of the most popular applications in the world – both automatically recognize www.bostonazure.org as a web address, while neither automatically recognizes bostonazure.org. (Both also auto recognize http://bostonazure.org.) Other text processing applications have similar detection capabilities and limitations.

Browsers also assume we want the www prefix; in any browser, type in just “twitter” followed by Ctrl-Enter – the browser will automatically put “http://www.” and append “.com” forming “http://www.twitter.com” (though then we are immediately redirected to http://twitter.com). [Note that browsers typically are actually configured to append something other than “.com” if that is not the most common TLD there; country specific settings are in force.] For the less common cases where you are typing in a .org or other non-default setting, the browser can only be so smart; you need to type some in fully on your own.

Reason #3: Advantages on high volume sites

While I have been aware of most of the raw material used in this blog post for years, this one was new to me.

High traffic web sites can get performance benefits by using www, as described in the Yahoo! Best Practices for Speeding Up Your Web Site, though there is a workaround (involving an additional images domain) that still would allow a non-www variant, apparently without penalty.

Reason #4: Azure made me do it!

It turns out that Windows Azure likes you to use the www prefix, as described by Steve Marx in his blog post on custom domain names in Azure. This appears to be due to the combined effects of how Azure does virtualization for highly dynamic cloud environments – plus limitations of DNS.

In fact, it was this discovery that caused me to rethink my long-held beliefs around the use of www. Though I didn’t find any posts that specifically viewed this exactly like I did, my conclusion is the following:

I concluded the Internet community has changed over the years and is now dominated by non-experts. The “www” affordance inserted into the URLs makes enough of a difference in the user experience for non-expert users that we ought to just use the prefix, even if expert users see it as redundant and repetitive – as I used to.

In other words, nobody is harmed by use of the www prefix, while most users benefit.

Two tips to properly configure the www prefix

One of the organizations promoting dropping the www – http://no-www.org/ – describes three classes of “no www” compliance:

  • Class A: Do what most sensible sites do and allow both example.com and www.example.com to work. This is probably the most easily supported in GoDaddy, and probably the most user-friendly, since anything reasonable done by the user just works.
  • Class B: Redirect traffic from example.com to www.example.com, presumably with a 301 (Permanent) http redirect; this approach is most SEO/Search Engine-friendly, while maintaining similar user-friendliness to Class A.
  • Class C: Have the www variant fail to resolve (so browser would give an error to the user attempting to access it). This is not at all user friendly, but is SEO-friendly.

So what are the two rules for properly configuring the www prefix?

Tip #1: Be user- and SEO-friendly with 301 redirect

Being user-friendly argues for Class A or Class B approach as mentioned above.

You don’t want search engines to be confused about whether the www-prefixed or the non-www variant is the official site. This is not Search Engine Optimization (SEO)-friendly; it will hurt your search engine rankings. This argues for Class B or Class C approach as mentioned above.

For the best of both worlds, the Class B approach is the clear winner. Set up a 301 permanent http redirect from your non-www domain to your www-prefixed variant.

You can set this up in GoDaddy with the Forward Subdomain feature in Domain Manager, for example.

You can also set it up with IIS :

Or with Apache:

Tip #2: Specify your canonical source for content

While the SEO comment above covers part of this, you also want to be sure that if you are on a host or environment where you are not able to set up a 301 redirect, you can at least let the search engines know which variant ought to get the SEO-juice.

In your HTML page header, be sure to set the canonical source for your content:

<head>
    <link rel="canonical" href="http://www.bostonazure.org/" />
    ...
</head>

Google honors this currently:

Google is even looking at cross-domain support for canonical tag (though other search engines have not announced plans for cross-domain support):

From an official Bing Webmaster blog post from Feb 2009, Bing will support it:

Reportedly, Bing and Yahoo! are not yet supporting this very well:

But it appears Bing and Yahoo! have either just implemented it, or perhaps they are about to:

You can also configure Google Webmaster Tools (and probably the equivalents in Bing and Yahoo!) to say which variant you prefer as the canonical source.

Unusual subdomain uses

There are some odd uses of subdomain prefixes. Some are designed to be extremely compact – such as URL shortening service bit.ly. Others are plain old clever – such as social bookmarking site del.i.cio.us. Still others defy understanding – in the old days (but not *that* old!), I recall adobe.com did not resolve – there was no alias or redirect, just an error – if you did not type in the www prefix, you were out of luck.

Another really interesting case of subdomain shenanigans is still in place over at MIT where you will find that www.mit.edu and mit.edu both resolve – but to totally different sites! This is totally legal, though totally unusual. There is also a web.mit.edu which happens to match mit.edu, but www.mit.edu is in different hands.

In the early days of the web, the Wall Street Journal was an early adopter and they used to advertise as http://wsj.com. These days both wsj.com and www.wsj.com resolve, but they both redirect to a third place, online.wsj.com. Also totally legal, and a bit unusual.

[edit 11-April-2012] Just noticed this related and interesting post: http://pzxc.com/cname-on-domain-root-does-work [though it is not http://www.pzxc.com .. :-)]

Credit for Traffic Light image used above:

  1. capl@washjeff.edu
  2. http://capl.washjeff.edu/browseresults.php?langID=2&photoID=3803&size=l
  3. http://creativecommons.org/licenses/by-nc-sa/3.0/us/
  4. http://capl.washjeff.edu/2/l/3803.jpg